|
Installation Instructions FOR MODEL
OK-SPM1-SM RACKS
Side-of-Pole Mounts for Siemens
SM46/50/55, SM2O, ST2O, ST4O and SP18 Modules
This rack is designed so that it can be
installed several different ways:
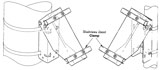
1. Poles with outside diameters of 3.5”
or less — the flat side of the Pole Bracket go against the pole, it can be
attached using the stainless steel hose clamps that are supplied with the
rack or with 3/8” diameter U-bolts sized for your pole. The hose clamps go
through the vertical slots in the back of the U-shaped Pole Bracket; the
U-bolts go through the horizontal slots.
2. Poles with outside diameters greater
than 3.5” — the open side of the U- shaped Pole Bracket goes against the
pole and the hose clamps go through the vertical slots in the sides of the
bracket. Proper size U-bolts can also be used as described above.
3. Wood Poles — use 5/16” are 3/8” lag
bolts through the two 13/32” diamet holes in the back of the Pole Bracket.
4. Flat or sloping roofs or vertical
walls — same as for wood poles above.
Because the most common use is
attachment to various sizes of vertical steel poles, stainless steel hose
clamps are supplied with each rack. U-bolts, lagbofts, or through-bolts are
supplied by the installer or can be supplied on a custom-order basis.
ATTACHING THE SOLAR MODULE
This rack is designed to clamp the
module to the rack using two 6” long stainless steel Clamping Channels.
These channels firmly clamp the bottom flange of the module to the Module
Support Arm.
ELEVATION ANGLE ADJUSTMENT
The elevation angle of the module is
adjusted by loosening the four 1%” stainless steel bolts that attach the
Module. Art Arm to the Module Bracket, or, the Module Support Arm and
re-tightening the four bolts. There are three small holes in the Module
Support Arm the will help you set your elevation angle — when aligned
horizontally with the two 1%” bolts the indicate angles of 30, 45 and 60
degrees.
Be sure all rack and clamp bolts are
tight!
|